LTI and SAML: The Basics
Published on Monday, August 26, 2019.
by Cameron Gera (@gera-cameron)
LTI and SAML single sign-on strategies are incredibly useful, but they are some of the hardest things to grok so I am going to put it in terms that normal developers and system administrators understand. These two standards have full-fledged specs out there on the internet and if you work well with those standardized papers I would encourage you to check those out. Sadly, every time I read those I left more confused and lost, so I am going to take a different route. What was most useful for me were diagrams. As I get into the details about each I will provide diagrams to explain what I am saying. So if you are looking for a simplified version of what these two standards are, then stick around.
LTI Standard
The LTI standard is very common in the academic space and somewhat in the business space. LTI standard stands for Learning Tools Interoperability. Knowing this name isn’t super useful besides letting you know that a learning management system (LMS) tends to integrate via this strategy. Tools like Canvas, Moodle, and Blackboard are examples of LMS.
How it works
LTI is an SSO strategy that is always initiated from the user’s LMS. It is a fairly streamlined process and I’ll do my best to keep it clear. Let’s check out this diagram to visualize the flow.
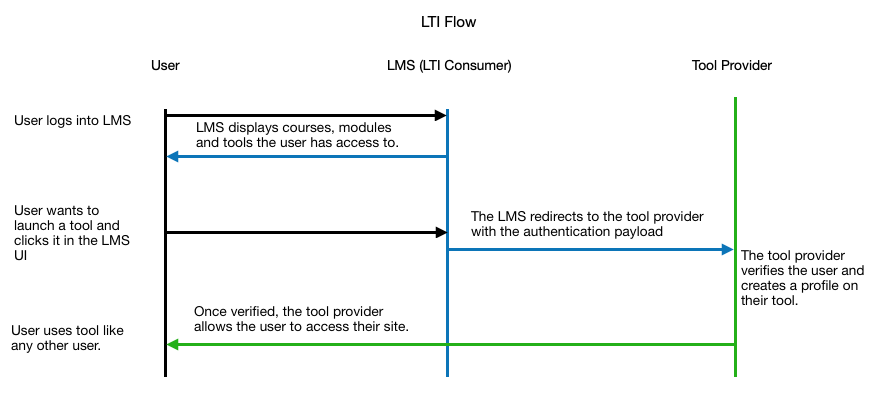
Okay, so we have two entities that will be communicating with each other. One is the LTI Consumer and the other is the LTI Tool Provider. The LTI Consumer is the LMS. The LTI Tool Provider is the external service that the LMS is trying to access. The authentication works through a key and secret system with some other configurable pieces on the LMS side.
The terms to know in regards to authentication are the following:
- Consumer Key - This is a privately shared key between the Consumer and the Tool Provider and must match on both ends.
- Shared Secret - This is the privately shared secret between the Consumer and the Tool Provider and must match on both ends.
- Launch URL - This is the URL that the user would go to when launching the Tool Provider.
- Domain - This is derived from the Launch URL and seems to be optional in my experience.
- Privacy - This is the level of privacy for the information shared with the Tool Provider.
- Custom Fields - These are the custom fields that will allow the Tool Provider to tailor the experience to a specific Consumer.
These variables are pretty simple to understand and they are all you need to set up when working with LTI. If you get these, you’ll be able to talk the lingo and have a good jist of whats going on. The tough aspect is implementing the logic for authentication on the Tool Provider side. But fear not! There are libraries out there that will help like PassportJS. These libraries take care of some of the magic associated with LTI, but they give you a friendly interface to work with. We have been using PassportJS at ITProTV for quite a few years and we rarely have issues with our original implementation. I would recommend!
SAML Standard
The SAML standard is more of a corporate world way to do single sign-on. SAML stands for Security Assertion Markup Language. It provides shared authentication between an Identity Provider (IDP) and a Service Provider (SP). This is helpful when an organization has many services they use and only want their users to have one login. Honestly thinking about how it works isn’t too difficult, so I am going jump right in.
How it works
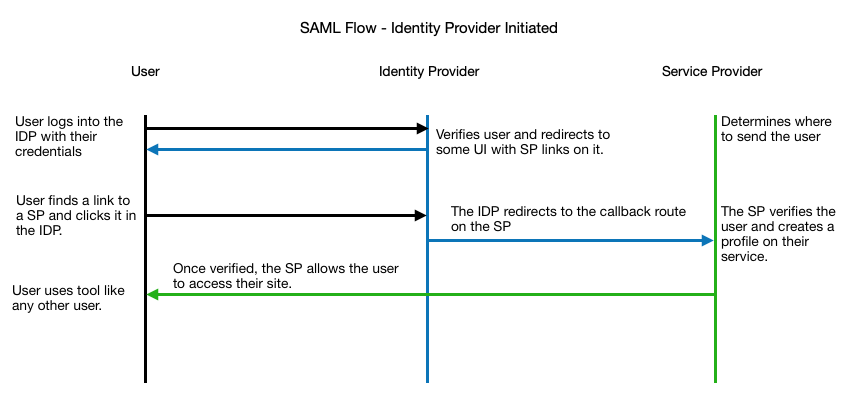
The core of SAML is having an authoritative source that service providers can trust. When setting up SAML, a set of metadata is shared between the two providers to set up a secure connection and make sure that all needed values for the SP are sent. See the flow diagram below for the end user’s flow for both SP initiated and IDP initiated.
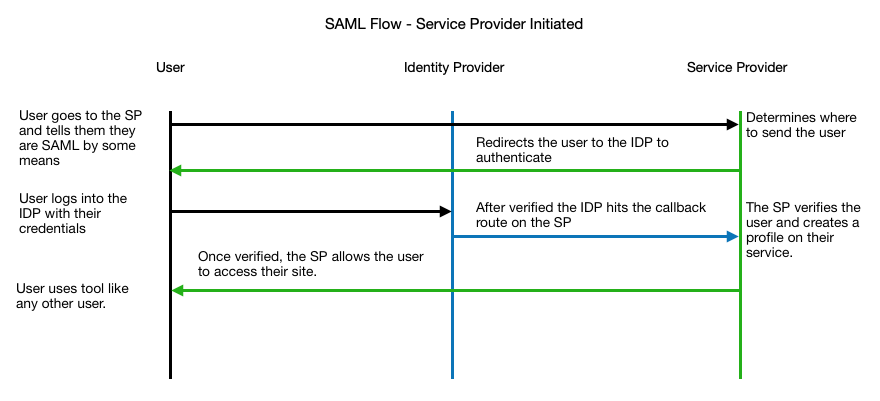
As you can see the user begins by accessing the service provider and informing them that they belong to a certain identity provider. Once the service provider knows who the user is and where to send them to be authorized, they are redirected to the IDP login screen. After the IDP says they are good, they redirect back to the SP with a set of user identifiable information. When the SP sees this, it verifies that the payload was signed with the same certificate that the SP has on file. Now that we have proven the user is from a trusted source, the SP can give access to the user.
Some terms to know are the following:
- Entry Point - This is the endpoint on the IDP side that the SP redirects to for authentication.
- Callback URL - This is an endpoint on the SP side that listens for the SAML Payload from the IDP.
- Issuer - This is the SP’s registered domain.
- Certificate - This is what signs the payloads to verify security.
- Relay State - This is a field that the SP can set when redirecting to the entry point that will be sent back in the payload.
Sounds pretty straightforward right? And it is! SAML is one of the most common integrations that I am familiar with. The ability to use a single login to access many tools is becoming a must-have in the corporate world. I would encourage you to check out more documentation if you are curious!
To Conclude
Here at ITProTV, we always look for ways to enhance our user experience and adding single sign-on integrations have been a huge bonus for many of our corporate accounts. The jargon around these single sign-on strategies can confuse all kinds of people and the scientific papers are almost too specific. With that being said, the overall desire for single sign-on is growing more and more because people prefer to have one username and password to log into work/academic tools. So I hope that after checking this out, you gained some clarity and maybe a little confidence. Some libraries make these integrations easier to get going.